Running Xilinx MicroBlaze Processor on QEMU
How to run Xilinx MicroBlaze Processor on QEMU
Since the official Xilinx documentation for newer versions of Vitis may be outdated, setting up QEMU to run MicroBlaze is not straightforward. This tutorial provides a working method that has been tested on Vivado 2024.2. The specific implementation can be found in the GitHub Repo.
Why Run MicroBlaze on QEMU?
QEMU (Quick Emulator) is an open-source emulator that supports multiple CPU architectures, including Xilinx MicroBlaze. During MicroBlaze application development, using QEMU for simulation offers the following advantages:
1. No Hardware Required — Easier Development
The MicroBlaze processor typically runs on an FPGA (such as Xilinx 7-series or UltraScale+), but hardware has several limitations:
- Expensive (requires an FPGA evaluation board)
- Difficult to debug (requires JTAG connection)
- Resource-intensive (consumes FPGA logic resources)
QEMU provides a pure software environment, allowing developers to develop and test MicroBlaze code on a PC without FPGA hardware.
2. Faster Debugging and Higher Development Efficiency
Running MicroBlaze code on FPGA hardware usually requires:
- Re-synthesizing and implementing the design after each code modification
- Flashing the FPGA, which takes time
With QEMU:
- The code runs immediately without flashing the FPGA
- Supports remote GDB debugging
- Can save and restore snapshots for quick testing
This significantly improves development efficiency!
3. Compatible with Xilinx SDK/Vitis Tools
QEMU provides instruction-set simulation for MicroBlaze, supporting:
- Running ELF files generated by Xilinx SDK/Vitis
- Testing embedded applications such as FreeRTOS or Linux Kernel
How to Set Up a QEMU Environment for MicroBlaze
The basic setup follows [1].
1. Download and Build QEMU
Run the following commands:
1
2
3
4
5
6
7
8
9
git clone git://github.com/Xilinx/qemu.git
cd qemu
git checkout tags/xilinx_v2024.2
sudo apt install libglib2.0-dev libgcrypt20-dev zlib1g-dev autoconf automake libtool bison flex libpixman-1-dev
git submodule update --init dtc
mkdir build
cd build
../configure --target-list="aarch64-softmmu,microblazeel-softmmu" --enable-fdt --disable-kvm --disable-xen --enable-gcrypt
make -j4
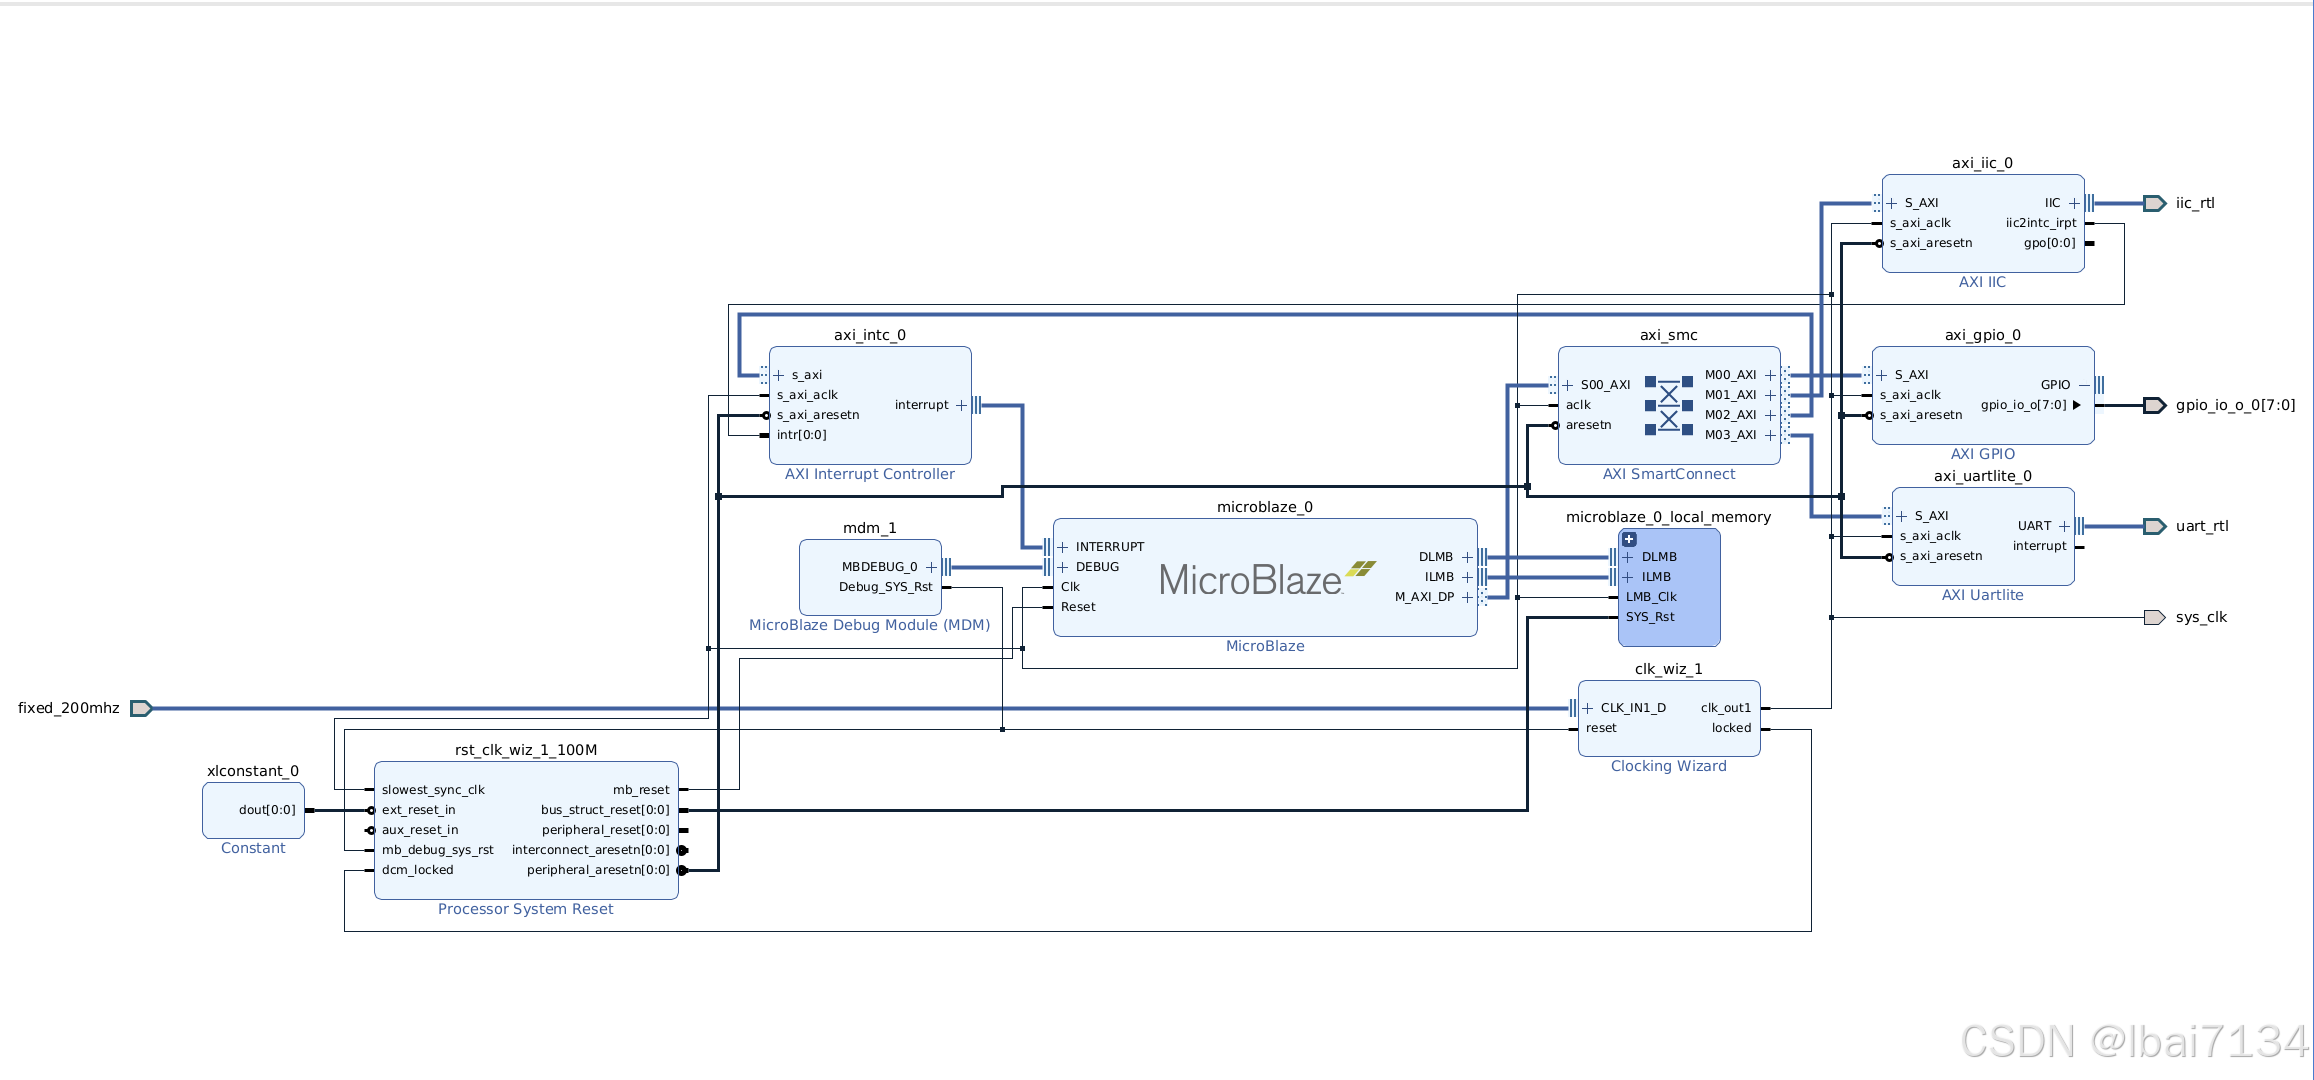
2. Create Block Design in Vivado (Tcl Script)
1
source design_1.tcl
 After completing all prerequisite steps, you can export the hardware and launch Vitis.
3. Create an Application in Vitis
- Create a Platform Component
- Select “Hello World” and “Peripheral Test” from Embedded Software Examples
- Compile the ELF file
4. Generate Device Tree (DTB)
Clone the device tree repository:
1
2
git clone https://github.com/Xilinx/device-tree-xlnx.git
git checkout tags/xilinx_v2024.2
As described in [3], run xsct in the terminal and execute:
1
2
3
4
hsi open_hw_design design_1_wrapper.xsa
hsi set_repo_path <path to device-tree-xlnx>
hsi create_sw_design device-tree -os device_tree -proc microblaze_0
hsi generate_target -dir my_dts/
After execution, the my_dts folder will be created, containing:
1
2
$ ls my_dts/
device-tree.mss  include  pl.dtsi  system-top.dts
Note: The directory "Xilinx/Vitis/2024.2/data/system-device-tree-xlnx" in the Xilinx installation path does not work for this process; using it will result in errors:
1
2
3
ERROR: [Hsi 55-1594] Core device_tree of version  not found in repositories
ERROR: [Hsi 55-1447] Error: running create_sw_design.
ERROR: [Common 17-39] 'hsi::create_sw_design' failed due to earlier errors.
Create the DTB:
1
2
3
cd my_dts
gcc -I my_dts -E -nostdinc -I include -undef -D__DTS__ -x assembler-with-cpp -o system.dts system-top.dts
dtc -I dts -O dtb -o system.dtb system.dts
You can verify the generated DTB file with:
1
dtc -I dtb -O dts -o system.dts system.dtb
The generated DTS should match system-top.dts exactly.
5. Run QEMU
1
qemu-system-microblazeel -M microblaze-fdt -serial mon:stdio -display none -kernel peripheral_tests.elf -dtb my_dts/system.dtb
Make sure the paths to qemu-system-microblazeel, peripheral_tests.elf, and system.dtb are correct.
If everything is correct, you should see output like this:
1
2
3
4
5
6
7
8
9
10
11
12
13
14
15
16
$ qemu-system-microblazeel -M microblaze-fdt-plnx -serial mon:stdio -display none -kernel hello_world.elf -dtb my_dts/system.dtb
Hello World
Successfully ran Hello World application

$ qemu-system-microblazeel -M microblaze-fdt-plnx -serial mon:stdio -display none -kernel peripheral_tests.elf -dtb my_dts/system.dtb
---Entering main---

Running IntcSelfTestExample for axi_intc_0 ...
IntcSelfTestExample PASSED

Running GpioOutputExample for axi_gpio_0 ...
GpioOutputExample PASSED

Running IicSelfTestExample for axi_iic_0 ...
IicSelfTestExample FAILED
---Exiting main---
Press Ctrl + A, then X to exit.